How to clear Teleios Ascendant
Starting up
As stated before, Teleios Asecndant is not an easy lair. There's a few tidbits I feel I should cover before you jump headfirst into your first TA run:
Don't use the queue. To enter Teleios Ascendant, you can do one of two things: Either head directly to teleios tower and enter the door through the "Enter Teleios Ascendant (Epic)" option, or by opening up the queue menu and picking the queue through there.
The queue will drop you into an existing Teleios Ascendant instance already in progress, with no guarantee that your role will fit into the team already assembled (provided the instance even has a team in it?) In other words, it will not sufficiently prepare you and your allies for the challenges you'll face. Much like Fire and Ice or other organized content, Teleios Ascendant requires a specific setup to successfully clear, and because of this, the preferred way to attempt TA is to manually form a team outside of the lair, and then enter it through the tower itself. This ensures that you both have a well-organized team, and that you start from a fresh instance.- Aim to have at least 7k health - Enemies in TA do a lot of damage. To the point I'd say that having less than this much health means that many bosses' stray attacks could easily one-shot you. To give yourself some leeway, especially if aiming to learn how the battles work, I'd highly recommend using growth gems and/or a Constitution superstat to ensure greater survivability. Once you got the hang of things, you can try your hand with a low-health build.
Having high health, for sure, is much more important on the healer and tank than the DPS roles. - Read and pay attention to data entries on each boss - In the guide here, these descriptions are italicized directly below the picture of the boss, and can be found at the entryway before the corresponding boss. These data entries, narrated by telios himself, tend to have useful hints on how to fight each boss. If you take nothing else away from this guide, it should be a given effort to try and pay attention to the hint each of the entries gives. Inversely, this guide is a lot more explicit about the tactics behind each battle, so read on if you wish to know!
- Bring Triumphant Recovery devices, or other ways to revive. - Even on the best teams, mistakes happen. Bringing along self-revival devices will ensure that if a legitimate fluke happens, you'll be able to continue a boss fight instead of being forced to restart due to just one small slip-up. Triumphant Recovery 4-packs are fairly common and will revive you at full-HP, but the Rebirth power also serves laudably for this purpose if you don't mind giving up one power slot.
Builds and Teams
The difficulty of Teleios Ascendant demands a fairly simplistic general setup of the team. Unlike some other bits of content, however, the requirements of exactly what is on the team isn't too strict. Essentially, the core structure of a good TA team should have the following:
Instead of going through what's expected of each of these essential roles, however, I feel it would be more pertinent to discuss the potential uses of each character role in this lair:
Notably when bringing in a DPS role, you should aim to run it in the appropriate role (if possible). Many of the fights in this lair can get monotonous if DPS isn't as high as it can be, so do your teammates a favor to ensure your damage output is as high as it can go, and increase that margin for error!
Tanks who want to focus on holding the attention of adds will want to focus much more on defense and wide-angle, long-ranged attacks. Because no other people on your team will be contesting you for aggro, even the slightest amount of threat boost will serve to reliably keep enemies on you, meaning you can focus on turtling. The biggest threat to any Off-Tank, in terms of being outdone in threat, is almost always the healer oddly enough, so don't forget to keep their attention with a few stray strikes.
Be prepared to block a lot; having a high-rank block could be a consideration to make. taking crippling challenge & challenging strikes is also a must.
Healers tend to draw a lot of flak from stray mobs and otherwise can face a lot of collateral damage. Because of this, it's highly recommended to take both a Revive and a Forcefield ability to allow yourself to revive fallen allies in the middle of a battle.
If you do go this route, I highly recommend investing in very strong Block Replacers. Cutting damage to around 1/4 is invaluable, even when you're not as innately sturdy as a tank.
The great thing about freeform hybrids is that they can potentially combine aspects of each of these and become something of a swiss army knife concerning content. So, read on about the fights and learn what sorts of builds you could devise to conquer the lair!
- Tank
- Healer
- Off-tank for Mobs
- DPS
- DPS
Instead of going through what's expected of each of these essential roles, however, I feel it would be more pertinent to discuss the potential uses of each character role in this lair:
Ranged DPS/Nuking
A DPS build designed with lots of AoEs and other powerful attacks is a good candidate for an Off-Tank, though not the best. Provided a nuker DPS has a large enough hit area to strike and draw in every add at every time, they can achieve their main role as an off-tank admirably, but inversely, the respawn period of add-on mobs (adds) can offer a bit of buffer time for you to help take down the main boss more quickly.
Focus DPS
If most of your DPS is about hitting a single-target, your main role is going to be helping in taking down the bosses in this lair. Because of the general danger around most bosses, however, you'll want to focus quite a bit on evasion and blocking while at it - tenfold more if you decided to run as Melee DPS! Melee builds will have the hardest time contending with the up-close effects of Teleios Ascendant, as his Genetic Siphon can transfer by accident when multiple characters are less than 10 feet away from one another (multiple melee fighters), and his various AoEs have a high probability of hitting behind him.Notably when bringing in a DPS role, you should aim to run it in the appropriate role (if possible). Many of the fights in this lair can get monotonous if DPS isn't as high as it can be, so do your teammates a favor to ensure your damage output is as high as it can go, and increase that margin for error!
Tank
A damaging, high-aggro tank is a great candidate for the main tank in this lair. However, great defense will also be a requisite, as many strong attacks will be directed right at you. For what you might lack in defense, your healer will have to compensate for. Thankfully, this means that if your healer is very powerful, the demands of the tank will mostly be reduced to just their aggro management and damage contribution.Tanks who want to focus on holding the attention of adds will want to focus much more on defense and wide-angle, long-ranged attacks. Because no other people on your team will be contesting you for aggro, even the slightest amount of threat boost will serve to reliably keep enemies on you, meaning you can focus on turtling. The biggest threat to any Off-Tank, in terms of being outdone in threat, is almost always the healer oddly enough, so don't forget to keep their attention with a few stray strikes.
Be prepared to block a lot; having a high-rank block could be a consideration to make. taking crippling challenge & challenging strikes is also a must.
Control Tank
This very niche role surprisingly is one of the most useful - by utilizing holds, knocks, or other techniques, and high defense (as well as potentially lots of self-healing), the traits of these characters perfectly suit the need to separate out mobs, and simply keep them busy while the other team members do the work. Compared to a highly-defensive tank, the control tank can use their abilities to interrupt and disable enemies who might be looking to strike at their teammates!
Healer
Alongside the Tank, the Healer is an essential role in this lair, and will likely supply all the revives, restoration, auras, and shields the team will need. Your business often means you'll innately be the target of a lot of adds, so prepare yourself with a bit of durability and just remember to look out for yourself.Healers tend to draw a lot of flak from stray mobs and otherwise can face a lot of collateral damage. Because of this, it's highly recommended to take both a Revive and a Forcefield ability to allow yourself to revive fallen allies in the middle of a battle.
Pure Controller
A straight-up controller can do a laudable job of being an Off-Tank, and keeping mobs under control for the first boss fights of the lair. Depending on how durable they are, they can possibly also apply their skills to the final battle, but the high damage of Teleios' minions can make things hairy, and if the Controller dies, those mobs will go nuts on the rest of the team. The ability to recover rapidly will be needed for a pure controller to get the job done!If you do go this route, I highly recommend investing in very strong Block Replacers. Cutting damage to around 1/4 is invaluable, even when you're not as innately sturdy as a tank.
The great thing about freeform hybrids is that they can potentially combine aspects of each of these and become something of a swiss army knife concerning content. So, read on about the fights and learn what sorts of builds you could devise to conquer the lair!
BOSS A - Medusa
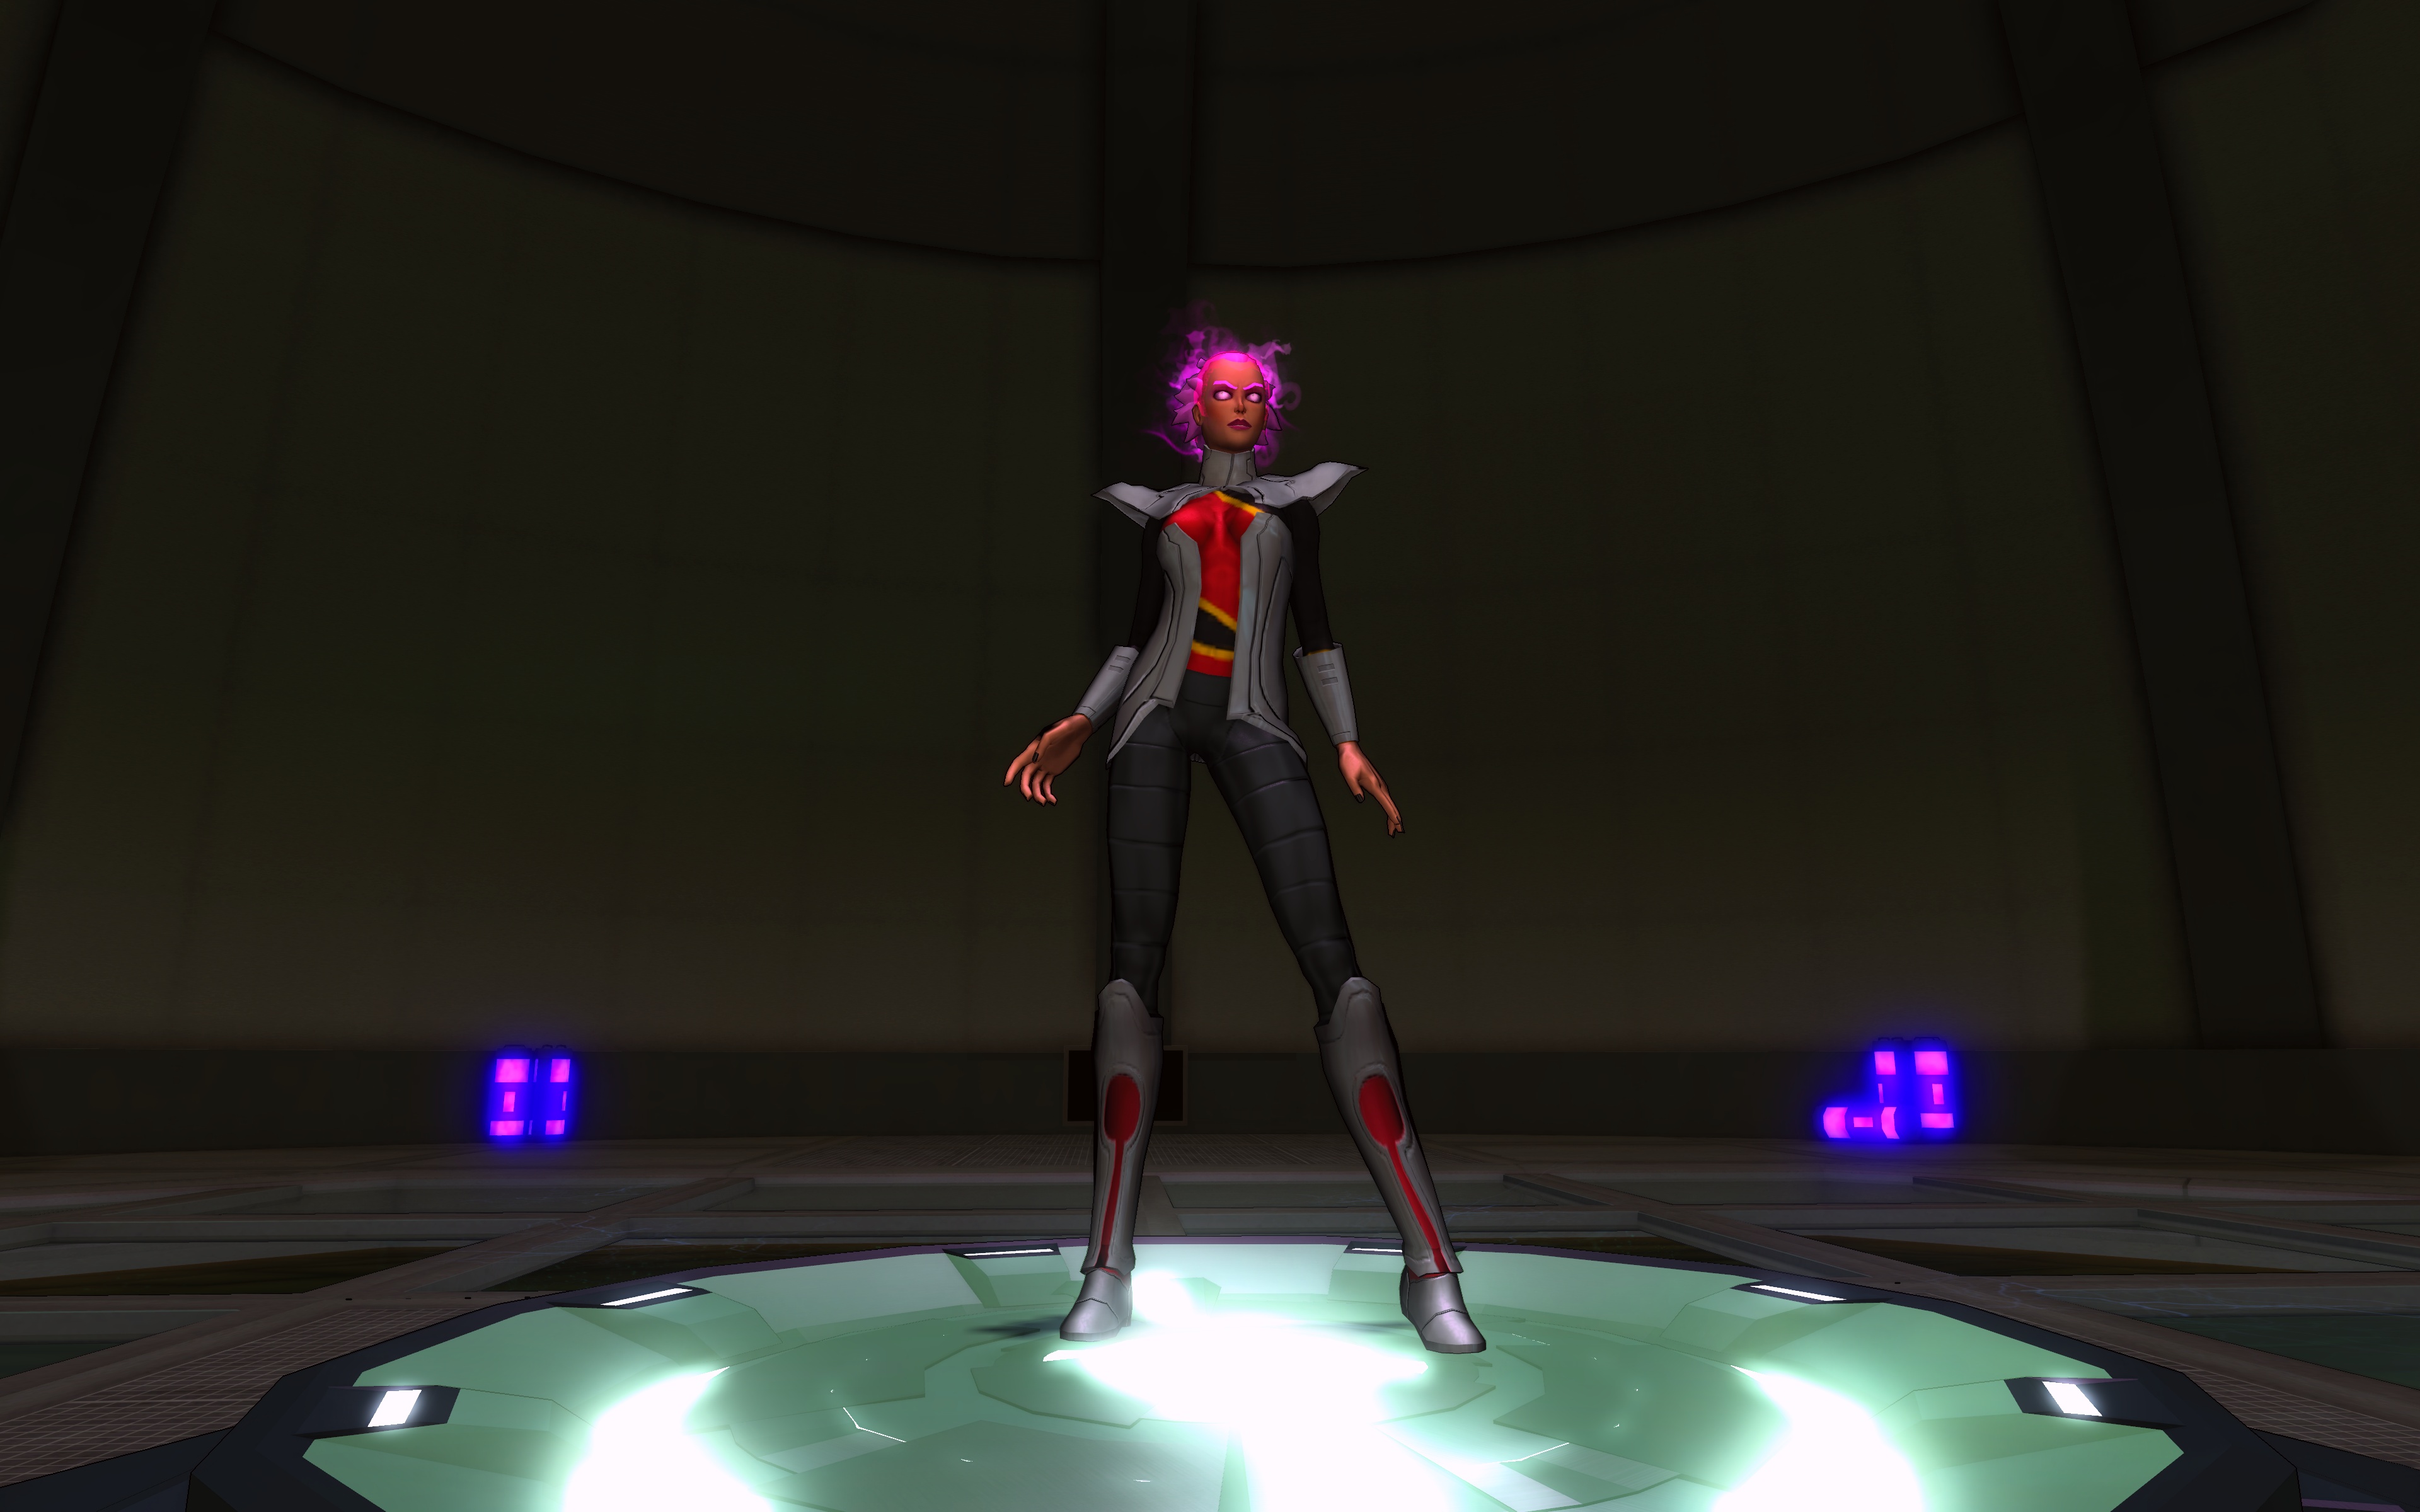 The human mind contains nigh-limitless psychic potential. While there are definitely more powerful psionic beings than Medusa, obtaining DNA samples from her where far less problematic than from Mind Slayer or Psimon.
By pushing the Medusa clone's mental limits, I've granted her the ability to create "psi-bombs".
These psychic manifestations link to nearby consciousnesses, then build to a fatal mental explosion. On the downside, if the potential victims absorb the psi-bombs into themselves, they can "defuse" the bomb.
This works up to a point, as absorbing too many of the psi-bombs results in the same degree of lethality as the explosion due to psychic overload.
Medusa's schtick focuses on major team coordination and awareness, counting on team members to keep on top of managing her psi-bombs, successfully blocking her Telekinetic Eruption, and taking her out head-on. Once her pattern is mastered, she is one of the easiest bosses to defeat, and the only boss that doesn't require a specific team setup.
Adds: Perfection of Mind
These floating brains utilize conical lightning attacks that deal heavy burst damage and can chain between teammates. While their attacks can be threatening, especially if all three hit one target at once, they are not quick attackers, and are mostly just distractions. They can be safely ignored aside from their damage. Keep in mind they can apply Gravity, which multiplies fall damage taken, and prevents Flight from operating.Four of them respawn every so often alongside Medusa herself.
Moveset:
- Telekinetic Eruption - Her favorite starting move is her Telekinetic Eruption, a roughly 120-foot PBAoE burst attack that can easily one-shot players if not blocked early. It's highly telegraphed by a very large pink sphere effect, as well as a charge bar. It's best to Full-Block this attack.
- Psi Bomb - Occasionally used, it will only be utilized directly after a Telekinetic Eruption, and causes 6 pink Psi Bombs to pop up around her. After several seconds, they will explode, causing 80,000 damage to every player on the map. To stop this attack, the players must move over the bombs to absorb and defuse them. As noted in the intro blurb, each player can only carry up to two bombs - any more will cause the same 80k detonation effect to trigger, resetting the fight. The numbering of the bombs, combined with Medusa's variety of deadly close-up attacks, means that it's best managed by all team members but the tank.
- Lance Rain - A powerful, spherical ranged attack that will hit her main target for heavy ego damage. Compared to a lot of other damaging attacks in the lair, it's not that powerful, and can easily be taken by a sturdy tank without blocking. It's not quite as harmless against other teammates, however. Unlike her Onslaught version, this lance rain does not root the target. It's telegraphed by a sphere floater, and her animation of raising her arms up above her head.
- Telepathic Kiss - Borrowed from the alert/boss version of her normal self, the Telepathic Kiss is a single-target charge that will stun the target if not blocked. This can be very deadly if she decides to follow this up with her Telekinetic Eruption, which needs to be blocked. To quickly and effectively counter this attack, use an early block.
- Psionic Echoes - This summons up two temporary psionic mirrors of Medusa, who simply use their basic Ego Blade attacks on whatever nearby heroes there are. They aren't very dangerous, though they can add up in damage if they focus on a single target (often not the tank). They can be avoided by simply running away from them, as they lack ranged abilities. This is telegraphed by a single-target floater, and Medusa raising her arms into the air (same charge animation as Lance Rain, but different floater sign).
- TK Blade Lunge - Probably her most damaging attack, this lunge will not only deal grievous damage to the primary target, but also roots them. This is the big reason why the tank likely shouldn't be tasked with going after the psi-bombs, due to the risk of becoming stuck in place. This is also a good time to mention - if you're fighting at range and catch Medusa's ire, don't run away, and prepare to block immediately. Many other bosses have similar, low-cooldown, powerful ranged attacks that can mess up teammates at distance quickly.
Strategy
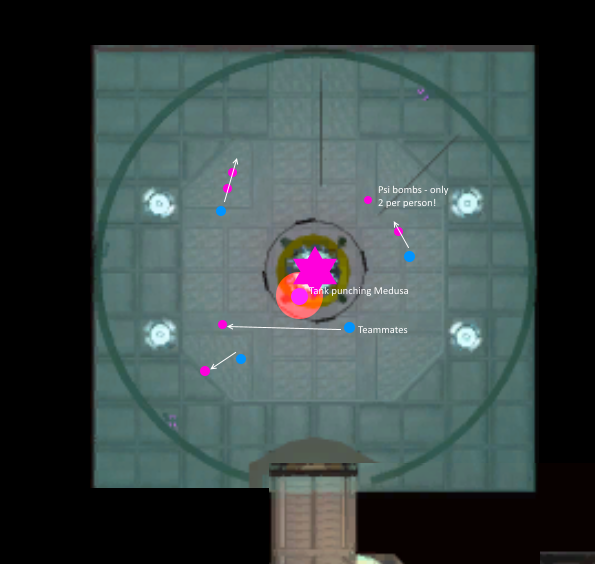 Tank - The goal of the tank here is to keep Medusa's attacks directed away from your allies. While her attacks are not much of a threat to a well-built tank, they will cause some impressive damage if other allies get caught up in the general vicinity of the tank. As a rule of thumb for these diagrams, areas in red represent where it's generally unsafe to be if you're a non-tank. In this case, because of Medusa's lance rain, it's generally not a great idea to hang around the Tank.
Everyone Else - Because Medusa herself isn't that huge of a threat when it comes to damage (especially with her lack of huge AoEs like the other bosses), most of your job will be fairly self-explanatory - beat medusa up, heal people who are in need. The only thing you need to watch out for, again, is her Telekinetic Eruption, and her psi bombs. And because you don't have to worry about attacks for a while after she uses her bombs, you will be free to deal with them while the tank continues fighting. Remember, only run into two bombs at most. In other words, just grab two pink balls, because most people just got two - actually come to think of it, this fight's kind of freudian in nature, isn't it? Kind of appropriate, considering who we're fighting...
Optimal Roles
- Tank - Damaging Melee
- Healer - Any
- Off-Tank - Any
- DPS - Any
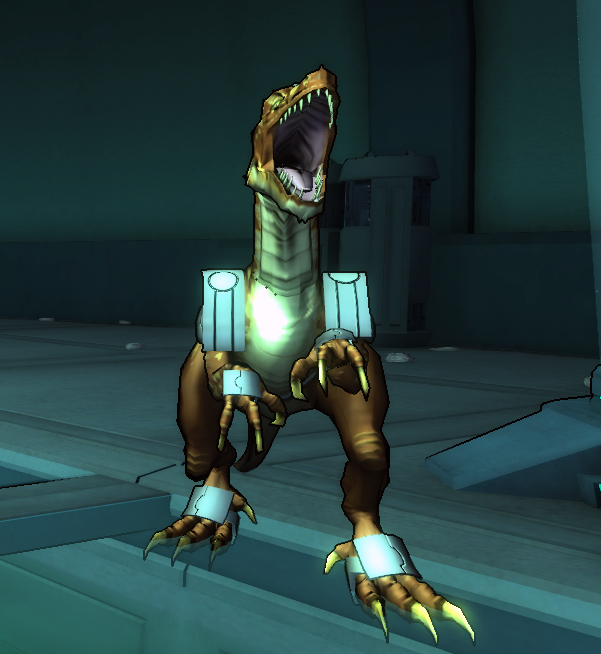
BOSS B - Teleiosaurus
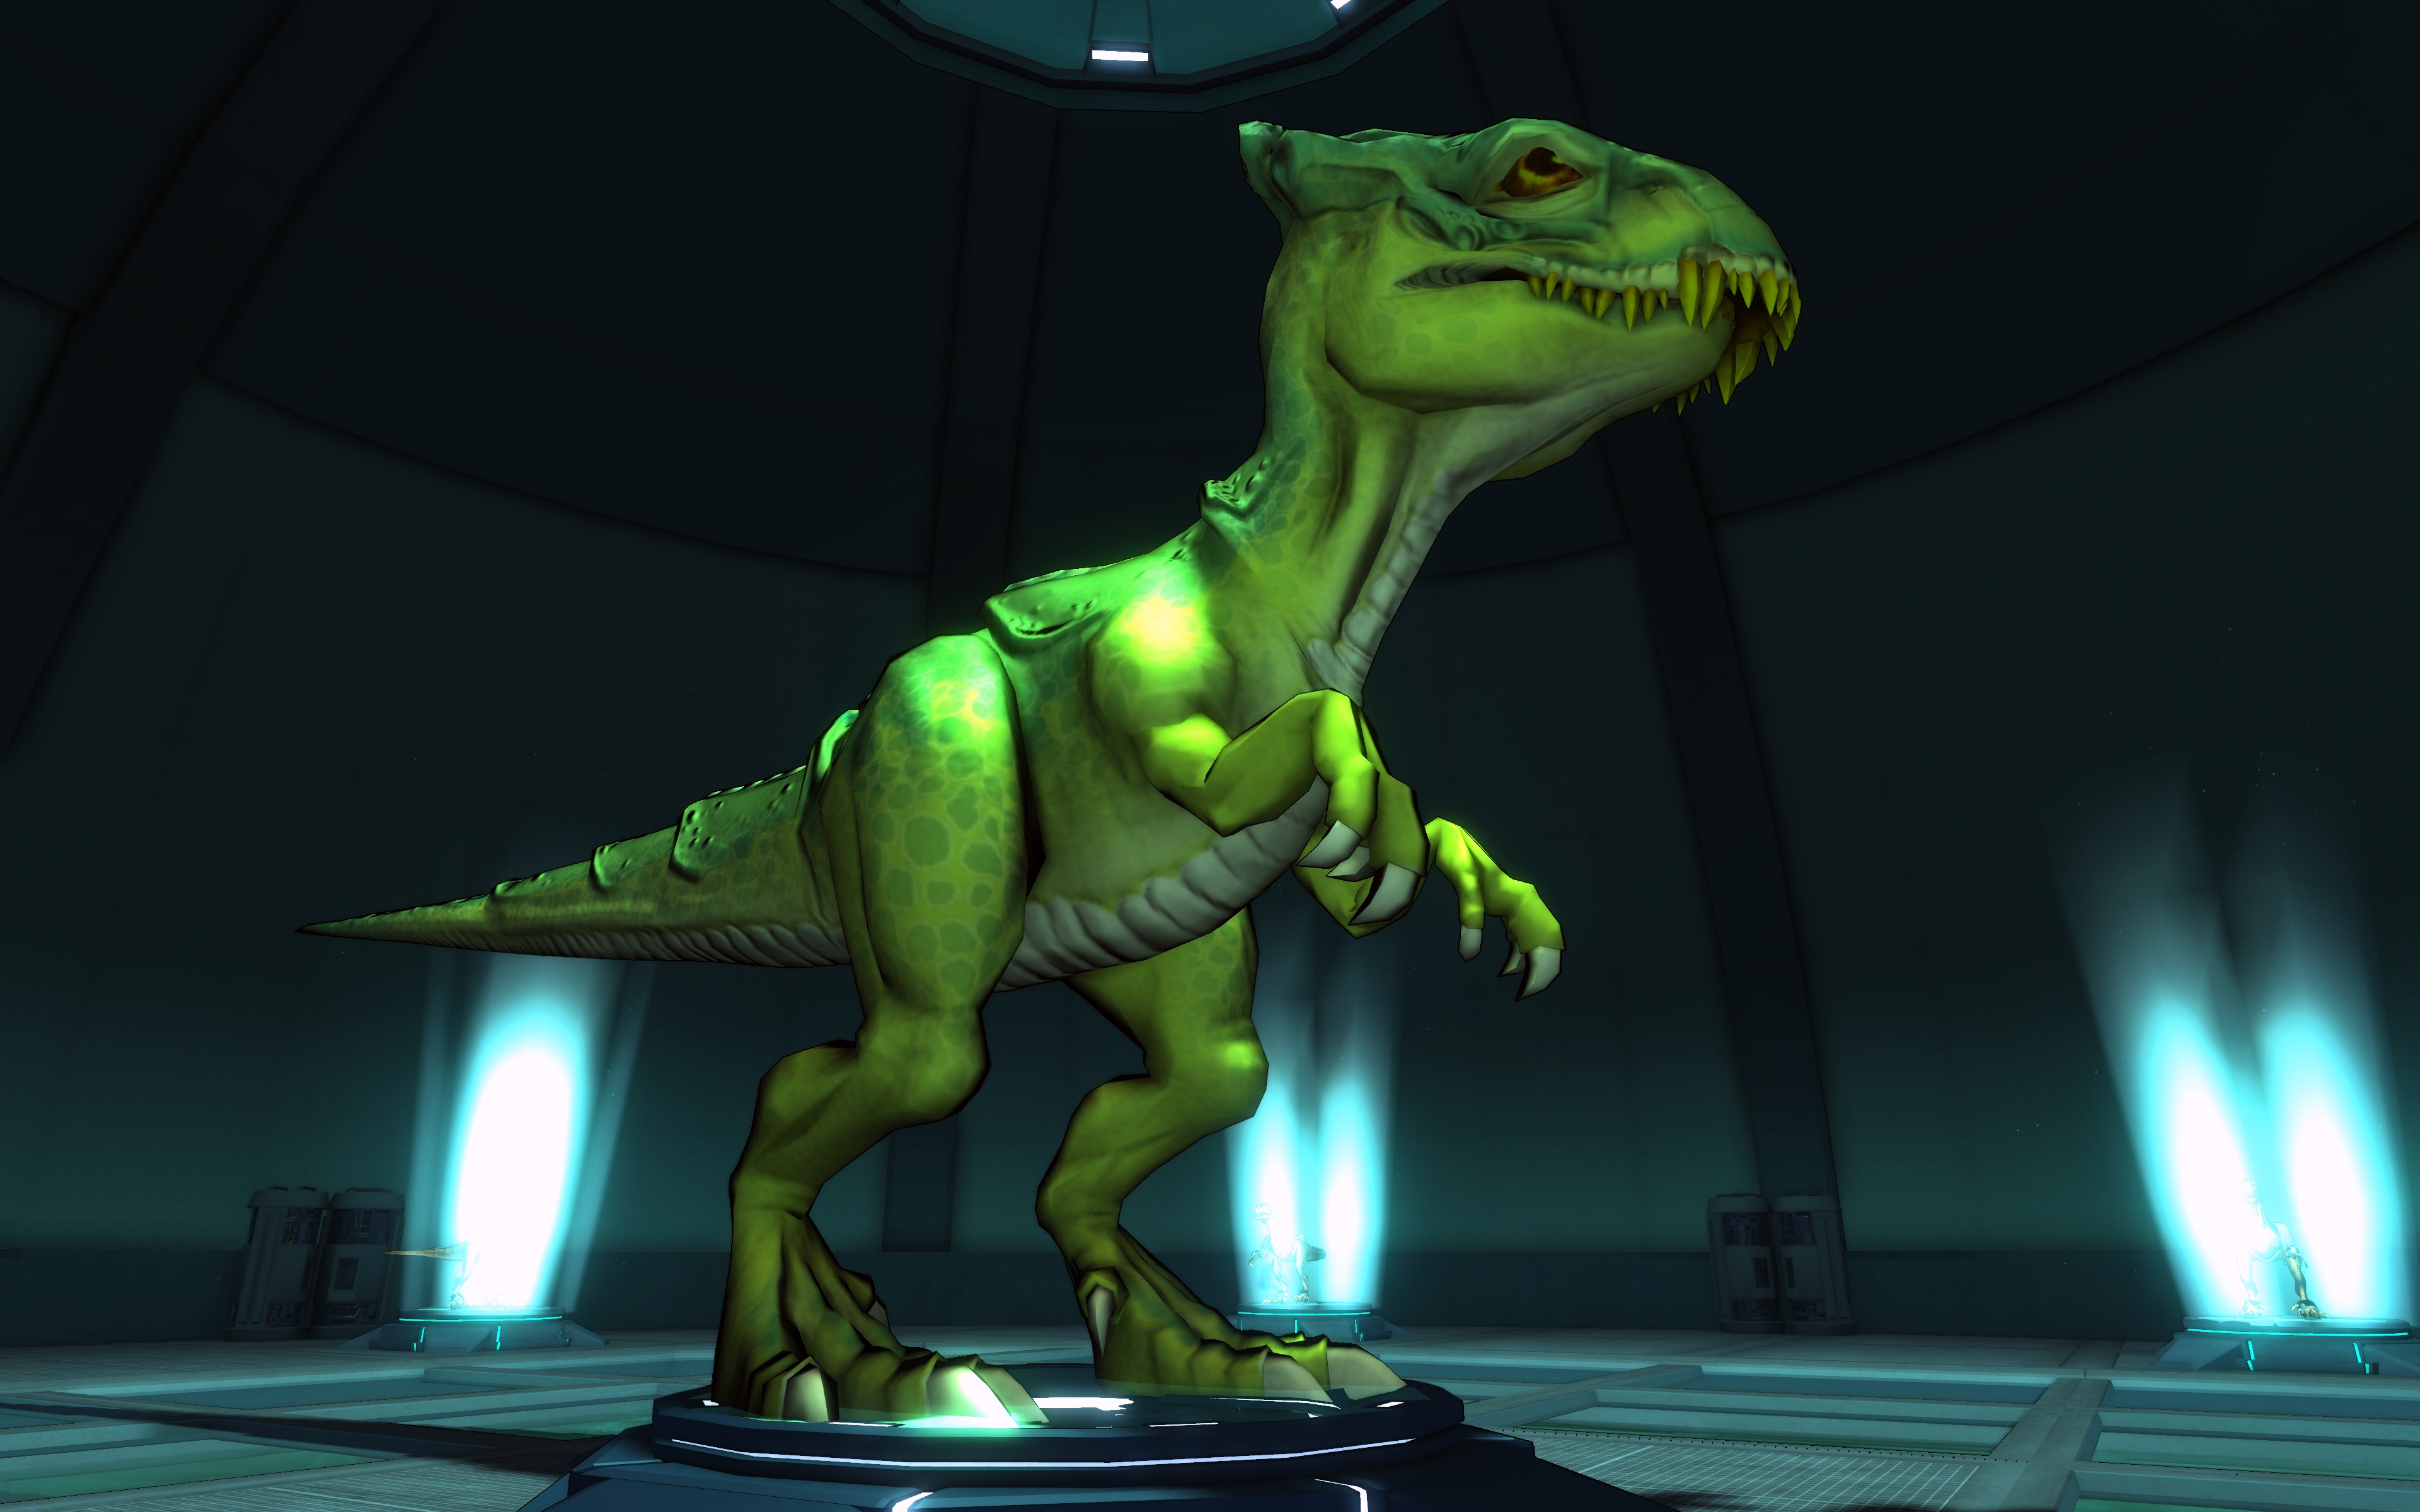 A perfection of the Dinosauria, augmented through the miracle of radiation! My Teleiosaurus has had many battles with that flaming ape Qwyjibo on Monster Island, as well as confrontations those ham-fisted "heroes". Those super-powered fools have no respect for my cloning genius! Do you know how expensive the cloning materials are to make new Teliosaurs?
In any case, the new Teleiosaurus Hatchling is coming along nicely, and we'll be able to relocate it to larger facilities soon!
Not differing greatly from her Monster Island Cosmic iteration, Teleiosaurus is arguably the easiest of the bosses to pick up and fight from a first-run standpoint. This is not to understate the Teleiosaurus' immense damage output and potential for healing, however, and while it is fairly easy to breeze through the fight, the Teleiosaurus does deal out grievous damage, stuns, and knocks that players will need to watch out for.
In general, the formation you should use is to have most of your team to the front left and front right of the Teleiosaurus, while the tank stays stationary and absorbs the brunt of the bosses' force. An unsteady tank (or rapidly switching aggro) can direct the Teleiosaurus' most volatile and dangerous attacks all over the arena. Keep things steady, and the Teleiosaurus fight is very safe.
Adds: Teleioraptors
Teleiosaurs are by far the weakest of the adds featured in the boss fights in this lair, and they mostly focus on ranged Rad-breath combined with melee bites. Their damage can add up if they all mob, but in general they are rather unproblematic and can be countered just by repeatedly killing them.Six will regularly respawn to help out Teleiosaurus.
Moveset
- Bite - Teleiosaur's basic melee bite bears some mentioning, because it is very powerful. Capable of dealing upwards of 3000 damage through tank defenses, they are best countered by regular short blocks between attacks. The bite hits in a narrow cylinder, and will split damage between each target hit, meaning damage per individual target can be reduced if multiple tanks stand in its path. However this isn't greatly beneficial unless the healer has an AoE heal. Extreme damage output aside, they don't have any CC effects.
- Spit - At range, Teleiosaur spits toxic goo at her target. While single-target and devoid of any area effect, it does just as much damage as the bite does (if not more due to speed) and is generally harder to mitigate. Keep in melee range, tanks.
- Deafening Roar - A PBAoE effect, it's telegraphed by Teleiosaurus stomping slowly twice, a PBAoE floater, and a yellow sphere. This roar, unless blocked early, will stun everyone in the room. Considering the importance of positioning in this battle, being stunned is a very bad situation.
- Poison Spines - Another PBAoE, it has no charge floater, and is telegraphed by a green sphere, and the Teleiosaurus crouching and glowing green on the back. When unleashed, it deals moderate damage to all heroes in 200 feet, and poisons them if they failed to block in time.
- Teleiosaurus Stomp - Yet another PBAoE, its animation is identical to Poison Spines, but is also paired with a proper floater and yellow sphere. When unleashed, Teleiosaurus jumps into the air and does a stomp, dealing powerful up-close damage and knocking everyone in range backwards. Much like spines, be prepared to block, as this unleashes even more damage than the spines!
- Radioactive Mending - This ability has the exact same telegraph tells as the Deafening Roar, with the exception of not creating a sphere effect. Instead of stunning all targets, however, it will instead leave a green radioactive patch beneath Teleiosaurus, and grants the Teleiosaurus both vulnerability (takes more damage) and Radioactive Mending. A couple seconds later, and Teleiosaurus will roar, and then do another stomp with no tell or effect. Provided she has the Mending buff, she will then restore a substantial portion of her HP over time. To stop recovery, she should be attacked rapidly, and dealt around 50,000 damage. If the buff is removed while she's being attacked, you will know she is safe not to recover HP.
- Tail Swipe - An extremely fast, damaging, and untelegraphed reverse cone, Teliosaurus will make a quick and mighty swipe with her tail, damaging and knocking everyone behind her in a very wide angle. This is the main reason why you want to stay to the Teliosaurus' front-side if you're not the direct tank, as this attack can quickly catch you off-guard and deal massive damage. It can also be done quite rapidly, giving even more reason why not to be behind Teleiosaurus.
- Radioactive Breath - With a cone floater, distinctive roar, and a slow breathing animation, the Radioactive Breath attack can be seen coming from a mile away and should be avoided (if you're not the targeted player) or blocked - If unblocked, it will do rapidly escalating damage to all targets in its reach, easily reaching 2000 damage per tick, and reducing defenses and dodge for each unblocked hit. Its coverage is very wide, so it should be taken care to move way out to the sides while this attack is maintained. If the breath is aimed at you - please, be courteous and hold position so as not to spread the breath potentially to other allies. Since She can't tailswipe while breathing, this is the one part of the fight where it's permissible (and maybe even preferable) to go behind Teliosaurus.
Strategy
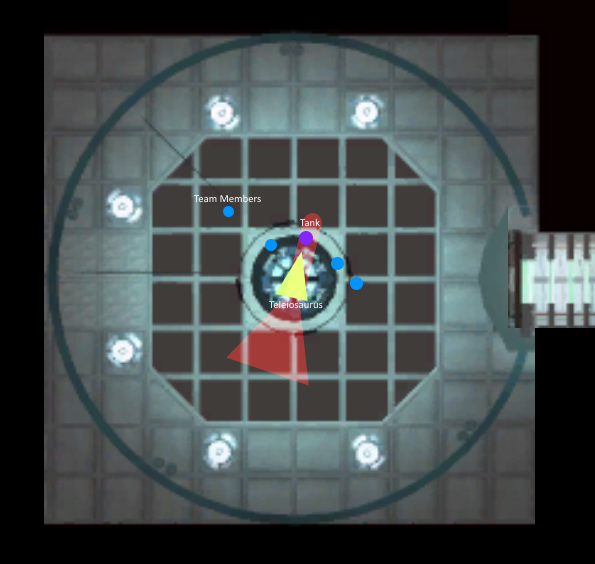
Tank - Your job will be to keep still in order to prevent Teleiosaur's attacks from swinging out of control. Most important, though, is to keep the Teleiiosaurus facing one direction, so that the rest of the team can reposition as necessary. Because of the dinosaur's high damage and stuns, you will spend a fairly good amount of the fight blocking, so remember to refresh your threat when you can!
Healer - The tank will be taking a rather substantial amount of damage, so most of your effort will be dedicated towards keeping them alive. Depending on your sturdiness, you might want to be prepared to defend or control, as your healing will more likely than not draw the ire of the teleioraptors. In any case, while your top priority is keeping the tank safe, you still should try and keep some distance between them and yourself - the Teleiosaurus' powerful bite is a cylinder attack that can hit more than one target in front of it for the same, massive amount of damage. The PBAoEs are still a large concern, and finally, don't try and stay behind the Teleiosaurus, or else you will get a massive tail swipe.
The same general defensive techniques for the healer apply here, too - Stay generally to the sides of the Teleiosaurus to fight it, perhaps more towards the front to avoid potential tail swipes. Inversely, when breath comes rolling in, you might want to circle more towards the back. The safest spot to stay, regardless of the Teleiosaurus' actions, is roughly by the side of their arm. Depending on role minutiae, you might find it worthwhile to use nuking attacks or control to pacify the teleiosaurs if they're giving other teammates trouble.
Optimal Roles
- Tank - Damaging Melee
- Healer - Strong, focused heals (Iniquity etc)
- Off-Tank - Any
- DPS - Any
BOSS C - Gravitar
 What a lovely evolution she turned out to be. And so powerful! The ability to manipulate the fundamental force of gravity. Such a an ability, responsible for the complexity in the universe, from spheres of hydrogen to stars in galaxies.
I need not do much to improve upon her perfection. Simply being able to replicate her abilities through my cloning techniques is enough... for now.
Acting essentially like her Rampage Version, similar tactics should be used here and adapted to her slower, more powerful attacks. Being knocked or stunned in this situation is very dangerous, and reliable, quick maneuverability is paramount to winning this battle. Keep mobile to defeat her and her minions.
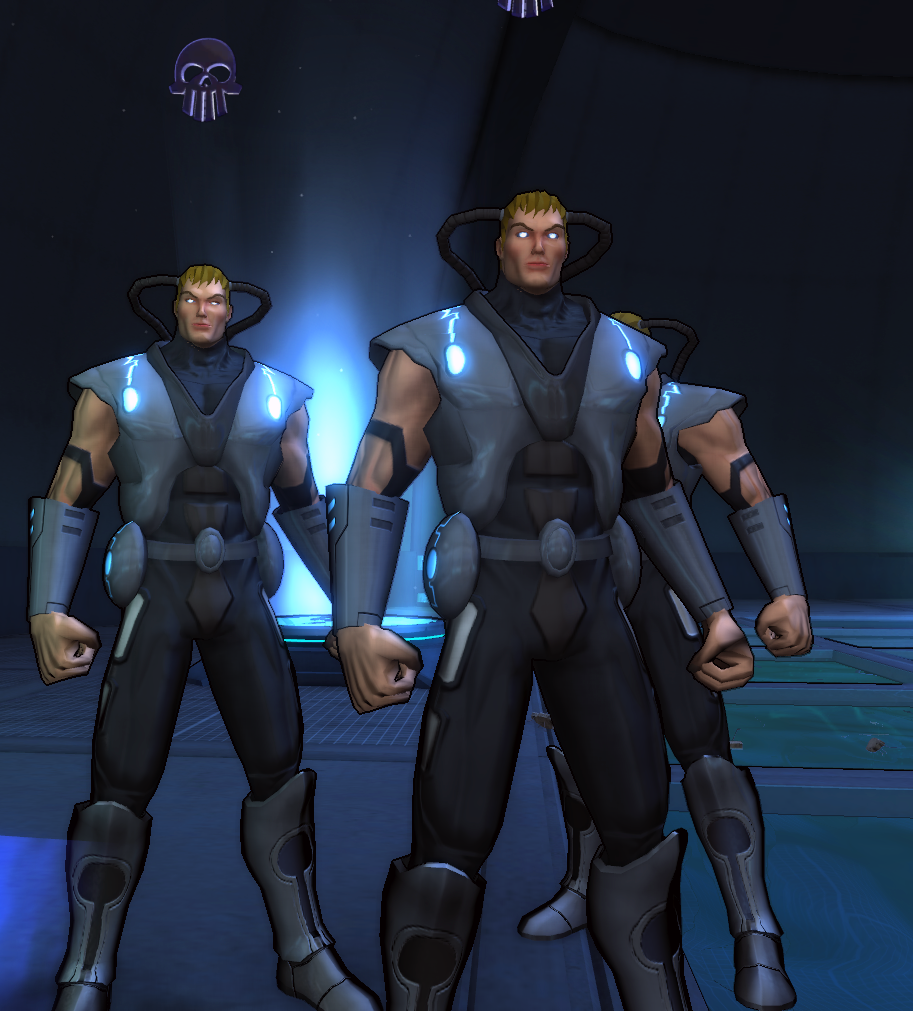
Adds - Perfection of Body's
These beefy brawlers are by and large the most directly damaging and fierce of the boss adds, and are equipped with a slew of Might attacks, including uppercuts, thunderclaps, and shockwaves, capable of tripping you up and stunning you to make you as vulnerable as possible to Gravitar's strikes. Because they're predominantly melee, however, they can easily be avoided and countered by constantly moving away from them.PoBs can also apply Gravity, which is a huge problem in this fight due to the need to move around fast, as well as the high possibility of taking fall damage.
Gravitar is only helped by three of these adds.
Moveset
- Force Geyser - One of only two attacks she uses against her primary target, Force Geyser keeps the tank important by giving Gravitar a strong, disruptive attack that does grievous damage. A healer will need to keep a close eye on the tank, as this attack can leave them very open to taking damage due to powerful knockup (usually into her cloning tube on the ceiling of the arena, making it hard to heal them unless right next to gravitar).
- Force Pull - Force Pull is the other single-target attack, which is used haphazardly when the primary target is out of melee range. Force Pull does moderate damage and knocks the user inwards towards Gravitar, and essentially guarantees that the tank isn't out of range for most of her powerful attacks. Stay near; being knocked and rendered helpless for a second can be fatal in this fight!
- Force Eruption - A PBAoE blast that will do damage to all up-close players. The general creed for the majority of her attacks is to just flee if you think you can make it out, and block if you cannot. All of her AoE attacks are telegraphed via charge bars and blue geometries showing the hit area of her attacks.
- Force Burst - A sphere attack directed on a targeted player, the effect spawns on top of the player and is kept in place. Force Burst can either be small or large, but regardless of size, it tends to do very high damage, and should be avoided if possible.
- Force Cascade - Versus her rampage version, Gravitar Clone's cascades are much slower, but also much more powerful, and quite frequent to boot. Like most of her attacks, they tend to get aimed towards random teammates. They are very easily sidestepped, and provided a travel power such as acrobatics or energy slide, they can even be jumped over.
- Gravity Well - After she's been reduced to 2/3rds health, she will use this ability - a massive PBAoE that will suck all players in ("I think we should get a little CLOSER!"). This ability seems to temporarily boost her attack power, and she likes to follow this up with a Force Eruption, so watch out! The best tactic concerning this is usually to resist the pull with a travel power in order to avoid her eruption.
- Force Bubble - Unlike most of her other attacks, Force Bubble will track her target, showing a deliberate crosshair over her intended target. Once the charge is complete, all non-blocking targets inside are held in place for an extended period. Once her health is low enough, however, she tends to pair this attack with the following:
- Black Hole - Also known as the dreaded 'Orange Bubble', This version of her attack is also slower than normal, granting more time than usual to avoid. This time is very much necessary, because this attack cannot be blocked or dodged, and is essentially a guaranteed kill if you're caught inside it. Make sure to block the Force Bubble early, and avoid getting into unwanted knocks from her adds!
Strategy
 Tank - Gravitar is a very big problem for the tank, due to her high knock power and very strong single-target attacks. Because every other member of the team is in similar danger, however, you have no obligation to stay still - the only attacks she uses specifically against you is the force geyser and her force snap (when at range), which, while damaging, have no area aspect, so feel free to maneuver and retaliate if you can.
Melee tanks are at the largest disadvantage in this fight, as not only does their range restrict when they can land strikes, but being hit by a Geyser successfully while in melee range will send you careening into Gravitar's cloning tube, which blocks healers LoS with you and can put you at great risk of being combo-hit to death.
If ground-based, using a jump travel power can mitigate most of the painful fall damage her force geyser deals.
Offtank - The offtank is a very necessary part of this fight, due to the adds' ability to apply Gravity to your party. Once you grab attention of the adds, you will want to keep them in a far corner to prevent their shockwaves from disrupting the team. As soon as you've solidified aggro on them, do the usual and play defensively, as you usually will be under Gravity's effects - any knocks you take will do heavy damage unless you use a jump-boosting travel power, such as Acrobatics or Superjump.
Healer - The majority of this fight will be spent rushing around the arena, trailing the Perfection of Body minions after you. Again, because everyone is at risk in this fight, you will also need to be responsive and attentive to ally condition, so be ready to chase down and heal knocked targets! The massive and erratic damage that Gravitar does also means that you need to be ready to revive allies when necessary.
Other Teammates - Same as the healer, you need to utilize mobility to avoid most of Gravitar's attacks, with Acrobatics, Power Slide, and Super Speed being great candidates for this task. So long as you keep mobile and avoid the attacks of Gravitar and her allies, you will be easily capable of landing good hits on her.
Optimal Roles
- Tank - High-Strength/Knock Resistant Melee, or Ranged.
- Healer - Highly mobile, long-ranged heals
- Off-Tank - Durable controller with long-ranged aggro-grabbing
- DPS - Any, though ranged DPS with non-rooting attacks work best.
BOSS D - Grond
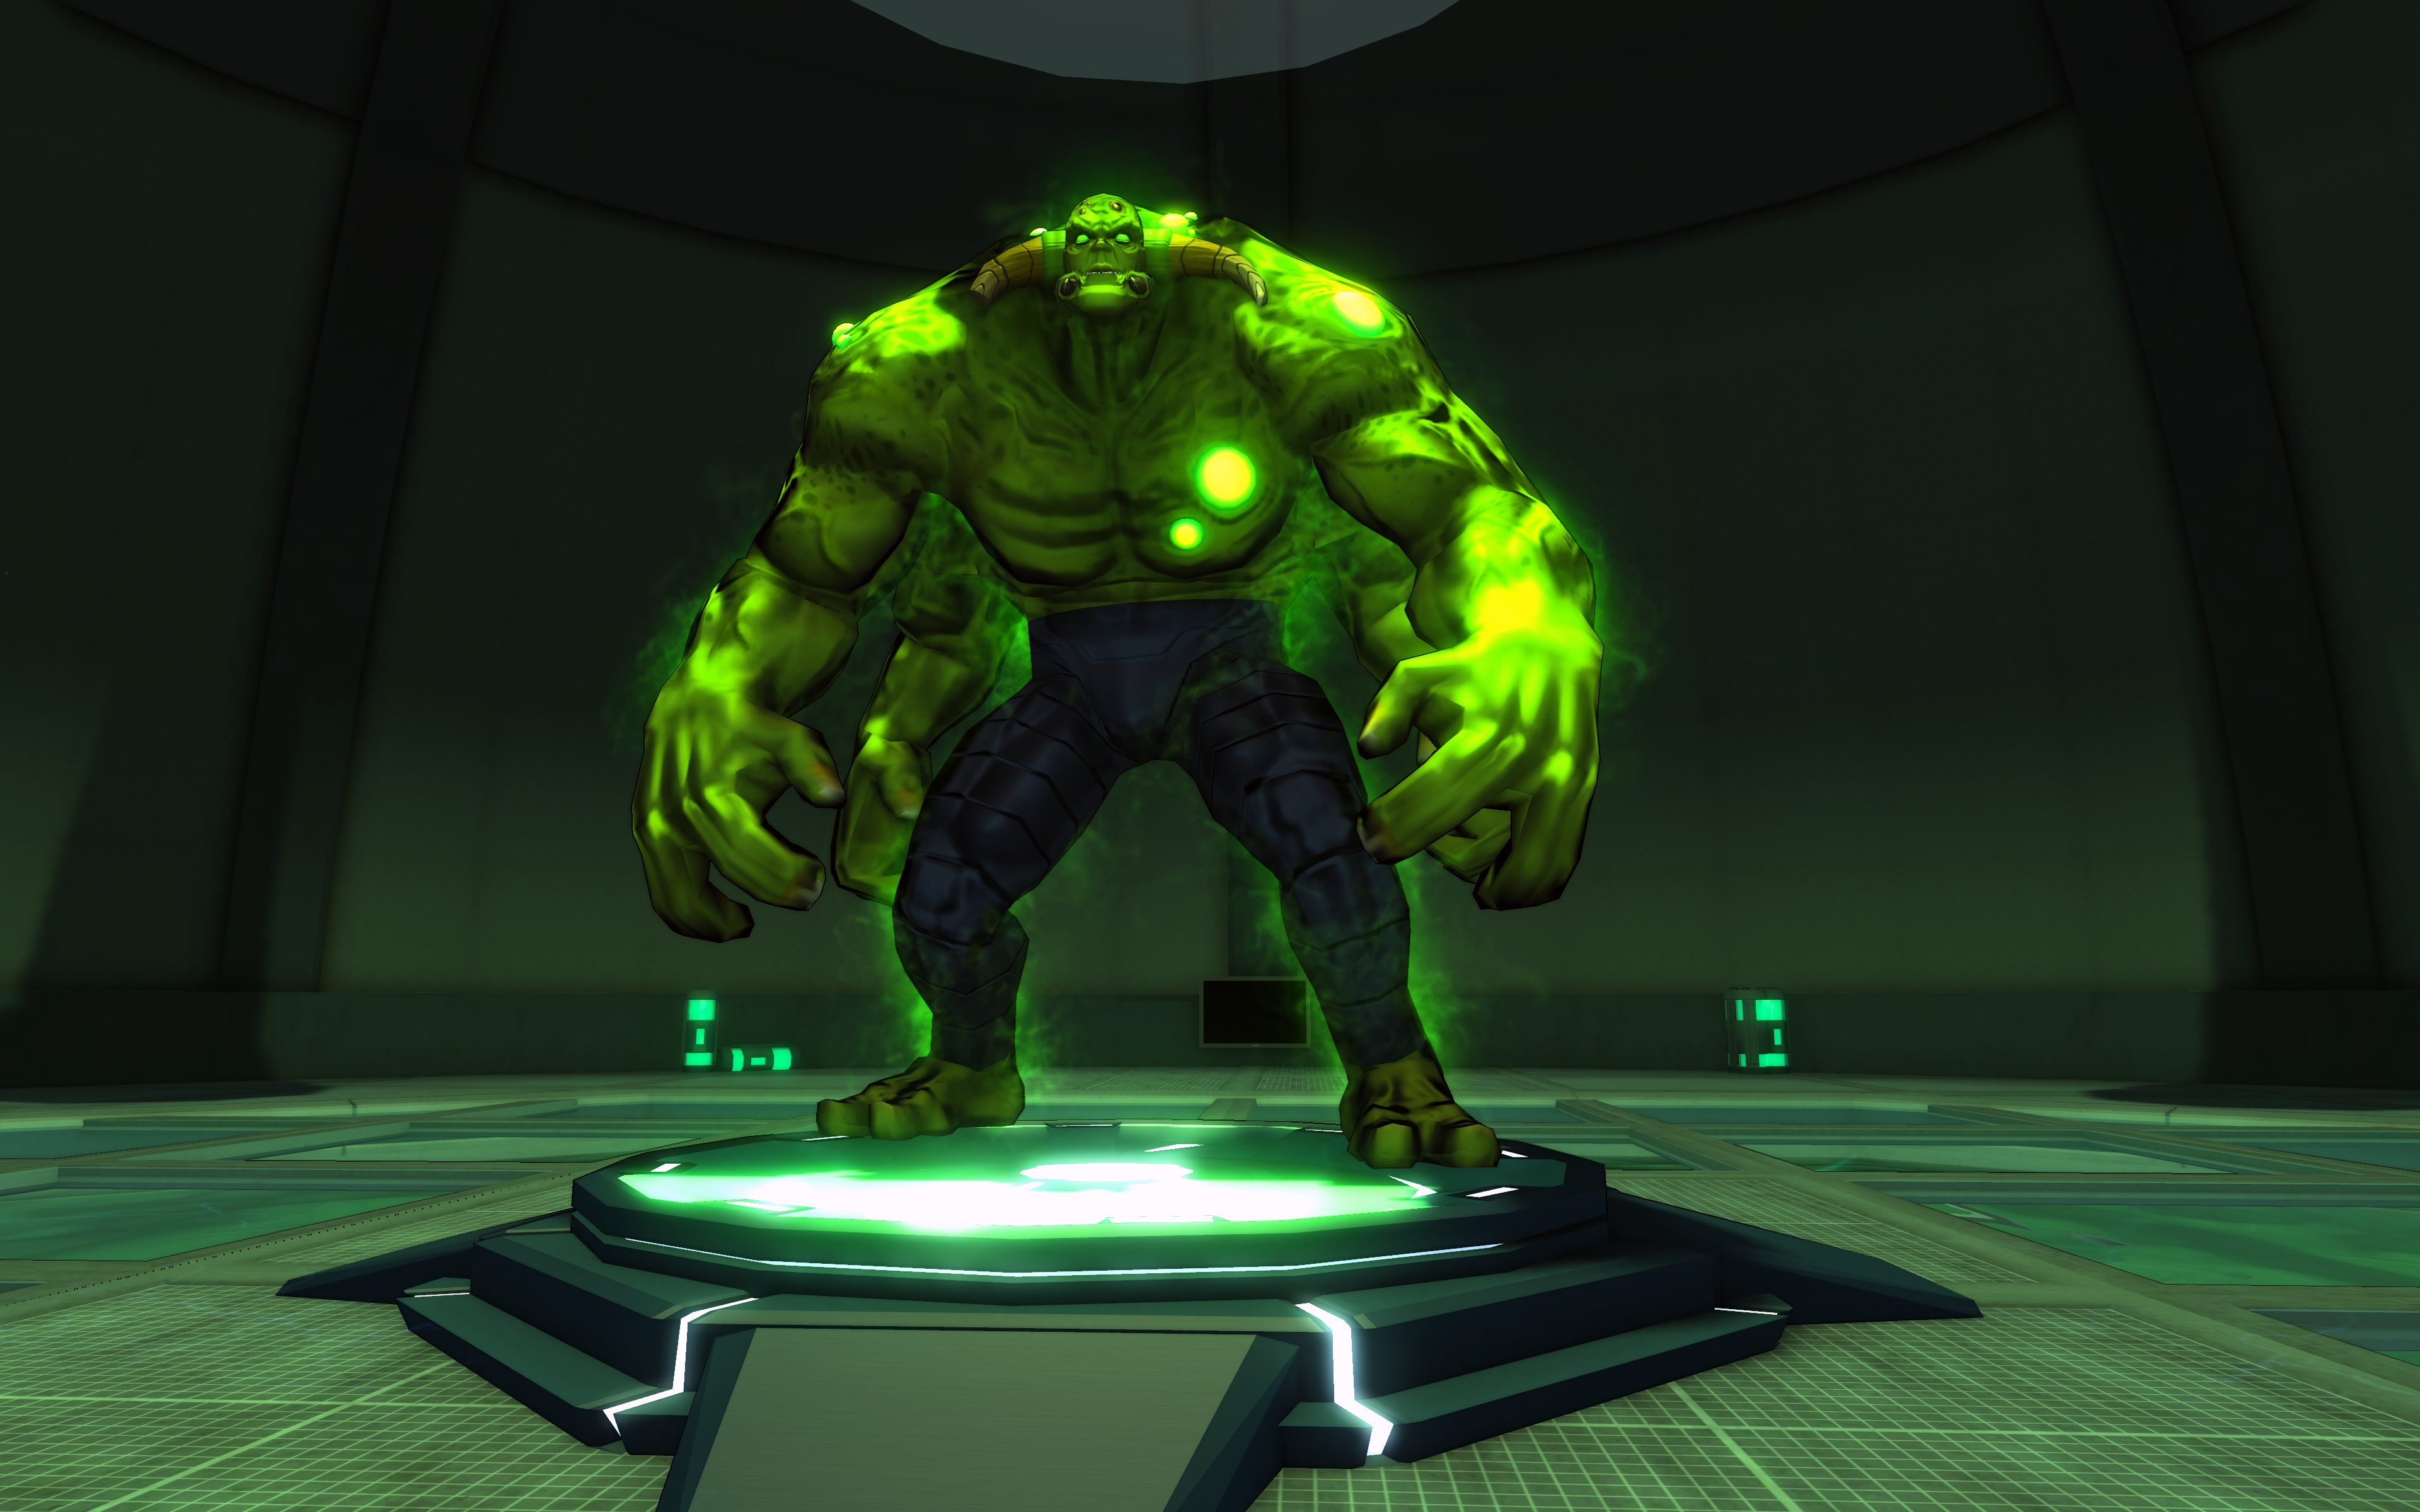 How can such a powerful monstrosity exist through such a bizarre series of occurrences? I spend years unlocking the mysteries of genetic manipulation and Grond just happens to become an apotheosis of radiation-induced rage and strength? I refuse to believe such happy accidents occur through blind chance!
No matter! My experiments with Grond DNA have resulted in a method for the creature to harness his radioactive energies. While under duress, the Grond clone can expel them in a spectacular fashion, resulting in a pool of deadly atomic fire. Few can survive these contaminated areas for long!
The slowest and most tactical of the fights prior to the final fight, Grond is one of the most difficult bosses to defeat in this lair, capable of pumping out massive crushing damage against his enemies, and constantly threatening his foes with a combination of deadly green puddles, and his troublesome adds.
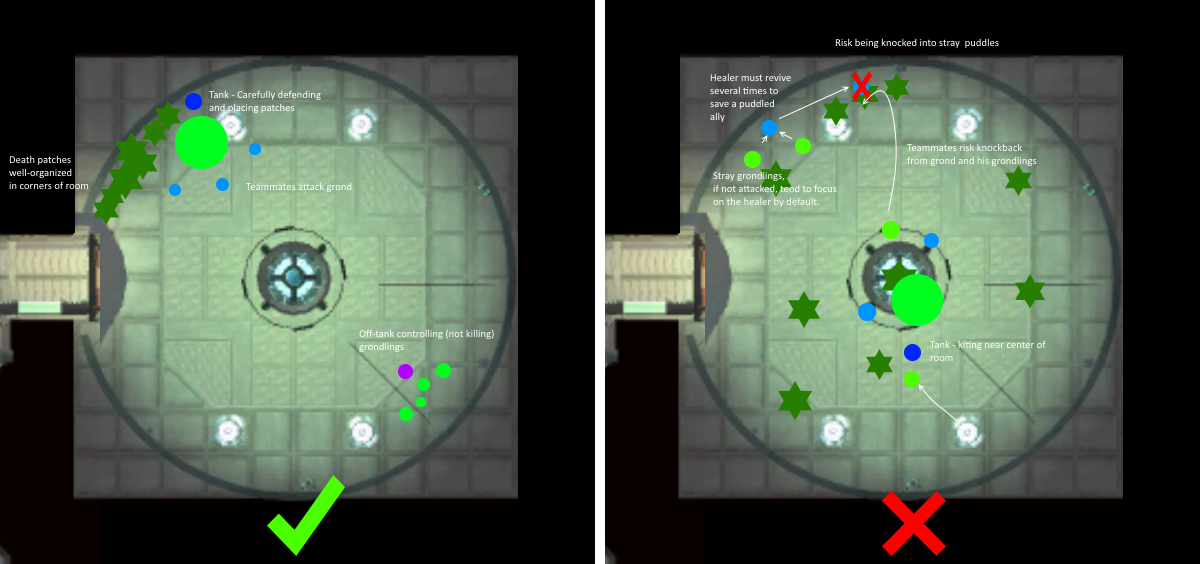
 The tank's efforts will go largely towards keeping aggro and making sure the distribution of atomic fire is kept to only relegated parts of the room - as their damage, unless blocked with enough HP, tends to very quickly kill almost all character types. Lining puddles up against the wall, or otherwise stacking them in a large clump, sometimes even placing patches inside other patches, helps keep the chaos to a minimum. But be careful of Grond's own knocks while doing this!
The adds in this fight are predisposed towards powerful knocks, so this fight proves to be the ultimate illustration as to why having a good off-tank character is essential. This image shows the exact kind of labor distribution you should strive for for a safe and controllable Grond fight - the tank and team take down Grond while the single off-tank weathers the assault of the adds, focusing on survival, aggro, and control over damage.
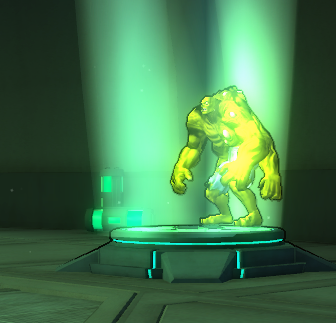
Adds - Grondling Clones
Whereas the Perfection of Body clones were the most powerful, the Grondling Clones are by and large the most troublesome, as you cannot use supreme mobility to avoid their attacks, let alone their most annoying one - a quad-rock toss that will send you flying backwards unless you get lucky, or are blocking.Grond's fight will supply him with a steady quartet of these buggers.
Moveset
- Atomic Fire Patch - Telegraphed by a cone-charge floater, the Atomic Fire patch throws a beam of green goop at Grond's primary target, doing moderate damage, and immediately spawning a fire patch beneath the target. People inside the patch will take huge bursts of damage that overcome almost all defense, and can easily kill most characters in about 2 or 3 pulses. However, the pulses do come slow and are quite delayed - which is a double-edged sword, meaning you can unleash a good final attack while still in a patch, but it also means that you should be zealous about blocking long enough to make sure it applies to the actual damage dealt.
Getting stuck in a fire patch is also highly troublesome, often requiring multiple revives to get a single player out of a patch if they landed in one - though it's certainly possible due to the slow ticks - often, the delay gives the player enough time to make a jump out of the patch to be successfully revived again. Again, this mainly points out the importance of having good mob and knock management to ensure that nobody gets into that situation in the first place.
He generally likes using this attack every 20 seconds. If puddle management is poor, the whole battlefield can quickly become a labyrinthine mess of radioactive death. - Wallop - The basic melee attacks of Grond have a small chance to knock the target backwards, which can be very bad if the tank's in front of a death patch. This is why the most preferable place to fight Grond is up against a wall usually, to keep his knock under control.
- Crushing Lunge - Used when Grond's target is over 20 feet away, this lunge does extreme damage, and usually will quickly catch non-tanks that manage to grab Grond's ire by surprise. If far away from Grond, be prepared with a block.
- Grond Slam Jr. - Ok yeah I don't know the actual names for some of these attacks. This PBAoE is telegraphed by Grond looking upwards and holding his arms out, with an appropriate PBAoE floater. The Jr. does high damage only in melee distance. However, it still should be blocked for safety's sake, because it shares the exact same animation with a much deadlier attack:
- Grand Grond Slam - As stated before, this attack looks exactly the same as the Grond Slam Jr., but it has a large 100 ft. radius and a massive knockback component. Its biggest danger is to distant non-tanks that aren't directly paying attention to Grond, as this attack can grievously damage them with combined direct and fall damage, as well as potentially sending them flying into a fire trap. This is why, if he charges a PBAoE, you should ALWAYS block.
- Radioactive Shockwave - This cylindrical attack is very similar to Onslaught Grond's attack, showing a green charge bar over Grond's head as he looks up to the sky and lands a massive ground punch. Unlike most stuns, there's no benefit to full or early blocking it - its stun effect is irresistable, and will apply even if you block correctly. Best thing to do is a well-timed late block, and continue blocking through his next couple of attacks.
Strategy
 There is a very distinct right and wrong way to do Grond, and the wrong way will quickly become apparent once it starts - unorganized patches of radioactive fire will be a huge impact on the terrain of the battlefield, and frequently can cause the troublesome death of allies that fall to stray knocks. Proper strategy is all about maintaining a tight equilibrium:
Tank - Your job will be to keep Grond interested in you, and only you. Not only this, but it's also your responsibility to make sure that Grond places radioactive patches in designated parts of the room where most allies won't be sent flying - mainly walls behind you, as you stand between them and Grond. Same as before, this sort of positioning allows you to aim Grond's deadly attacks more away from the team than towards them.
Be careful and keep your movement steady, however. Your defenses, though, high, won't be enough to survive in a radioactive fire patch for long. You'll need to keep moving and blocking to ensure that the spread of fire is steady and compact.
Off-tank - The off-tank's big chance to shine comes in this fight, where Grondling knocks can become a serious problem if unattended. Your main goal here is to initially grab the interest of all Grondlings and then herd them off to a distant corner, to separate them from Grond and his massive AoEs, and keep the grondlings aggroed and controlled. Like with most crowd control, it's preferable not to kill these adds, as respawning adds can be volatile and will go after random targets - often starting out with their most troublesome attack, the far-ranged knockback rock toss.
Healer - Because Grond (and his PBAoEs) pump out a lot of damage, most of your time will be spent nearby the main group, healing those smashed by his strikes.
Other Teammates - Fulfill the main goal of taking down Grond! As usual, and the same with the healer, make sure to watch out for Grond's Grand slam, as it can easily knock you way across the arena if unblocked, as well as taking a very significant chunk of health out.
Optimal Roles
- Tank - Knock Resistant Ranged
- Healer - Extremely long-ranged heals
- Off-Tank - Controller
- DPS - Any
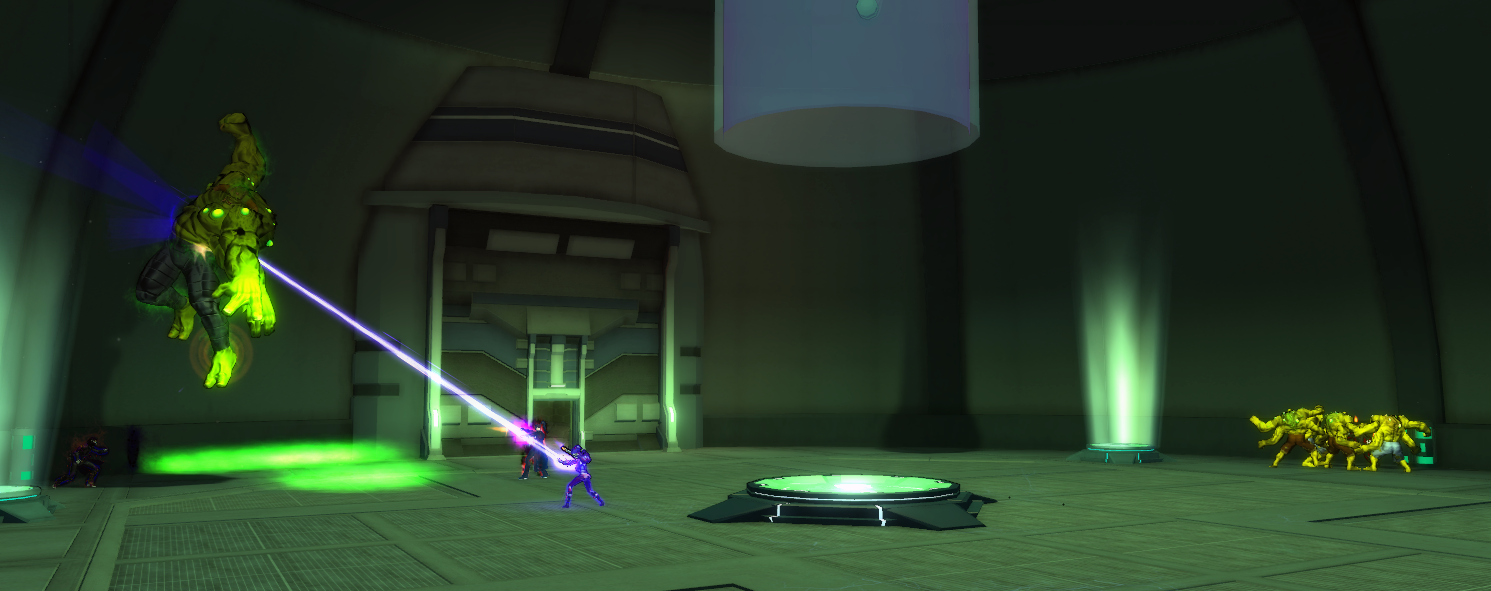
FINAL BOSS - Teleios Ascendant
 Finally! My new Ascendancy Formula is ready for testing! By imbuing Moreau's serum with recombinant DNA alterations from Grond, Gravitar, and Medusa, I've created a concoction granting me power beyond imagination! It is highly unstable at this point, but that's a minor setback in the advancement of my cloning SCIENCE!
If those small-minded heroes dare to assault my tower again, I'll be ready for them! When I activate the Ascendancy Formula, I'll be able to expel a "Genetic Siphon" to my antagonist. It slowly degrades the genetic bonds of the target, becoming more unstable over time. Unless the victim can pass the Genetic Siphon to someone else, they will soon be defeated! And I, Teleios, will go on to become Master of Humanity!
Using a full gamut of moves from the previous bosses you fought, alongside his own dastardly genetic tricks and moves, the final battle against the Teleios Asccendant is the toughest of the battles, fittingly, and requires a great deal of attention and coordination to successfully clear.
The big gimmick of this battle focuses on balancing a debuff known as Genetic Siphon - Every second this debuff is on a character, they will gain another stack of Genetic Siphon, and take a percentage of their HP in damage equal to half the siphon stacks (30 stacks of siphon = 15% total health damage in that second). This makes the effect very deadly if not managed properly, and it can and will methodically take out the whole team if unchecked (not that everything else won't do the job for it).
The Siphon starts out first on the player who initiated Aggro against Teleios. It is passed only by standing next to an ally for 3 seconds, after which the debuff will go on cooldown. It takes a full 70 seconds per player for their stacks to reset, after which they can pick up Siphon again and only take 0.5% HP damage for a little while.
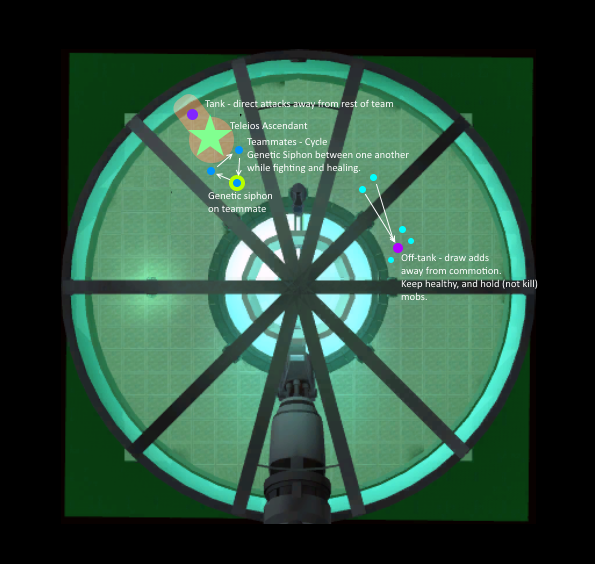
It takes roughly 35 stacks to successfully cycle the debuff between 3 players (usually the two DPS and healers), and shorter if done between 4 players (if the tank doesn't mind.) Like with the Grond Fight, having a sturdy, controlling off-tank to babysit the adds is very valuable:
Adds - Perfection of Body, and Teleioclone Mk. II
This deadly duo of 6 enemies total combine the annoying, often indirectly fatal effects of crowd control from the Bodybuilders, with the sheer laser damage that Telieoclones can put out. (if you pay attention to how damage is received on the lower levels, you will know where most of those huge sudden bursts come from.) Their extreme damage, combined with the ascendant's own set of fatal attacks, means that it's highly recommended to keep them under express management, as the necessity to focus on surviving the Ascendant's attacks and keeping player spacing proper to avoid Siphon mishaps is too important for random mobs to mess with.The enemy mobs come in a set of 3 Perfection of Body master villains, and 3 Teleioclone Mk. II villains. They will keep respawning only up until the Ascendant is defeated. Of note, while PoBs will be happy to follow you wherever you run, Teleioclones sometimes will fail to track after their target - which can be a blessing and a curse for off-tanks.
Moveset
- Genetic Siphon - As stated before, this is the main gimmick of the fight, and is actually the move that the Ascendant leads off with. Its effects are explained above, and the move has no windup or tell. Every time the person with Siphon dies (or, -bug-, is knocked out of aggro range or breaks line of sight), he will apply a new Genetic Siphon to his current target (usually the main tank). With the possibility of dying, it's very important to keep track of where the Genetic Siphon goes to protect the team. Keep an eye on your allies and their buffs!
- Goo spit - A weird move borrowed from Teleiosaurus, He only uses it when his main target is out of melee range, and while its damage is high, he often doesn't use it due to much preferring melee combat.
- Telekinetic Eruption - Adapted from Medusa, TK Eruption is similarly fatal to Medusa's unless properly blocked early. Thankfully, Teleios doesn't use the same Psi-Bomb gimmick she does - just sudden, far-ranged, potentially fatal damage once in a while. This is the big teamkiller if the Perfection of Body mobs manage to knock team members down!
- Lance Rain - Another Medusa Move, Lance Rain will hit all targets in a sphere around his primary target for some damage. Much like with the Medusa fight, this can make it hairy to stay nearby the tank, and with the rest of the Ascendant's moves, this can make it even harder - all the more reason why most teams, when cycling siphon, tend to leave the tanks out of the mess. It's telegraphed by a Cone floater, combined with Teleios raising his arms to the air.
- Force Cascade - Borrowed from Gravitar, the Ascendant's force cascades are similarly randomly-aimed at people, ensuring that no single party member is safe. However, it's far from his most damaging attack, and it can similarly be avoided just by sidestepping a bit.
- Radioactive Shockwave - Taken from Grond, Teleios' spin on the attack is very nasty, not only dealing out a stun, but also pairing it with Lingering Radiation - anyone who didn't block the attack has their defenses stripped, and even their dodge chances reduced. To make sure you do not lose your defense, you always should completely block this attack. The move has a cone floater, and a green bar that fills up way over his head (hard to see if zoomed in) combined with no actual animation for charging. It can catch you off-guard if you don't pay attention to floaters!
- Normal Shockwave - A bog-standard shockwave, adapted straight from the Perfection of Body clone. The Shockwave will do high, continuous damage to targets in its range, and when finishing, will knock them down. Despite the facing of the Ascendant, it can be avoided simply by stepping several feet to the side.
- Uppercut - A strong, charged uppercut - again, borrowed from the Perfection of Body - this can knock you straight into the ceiling and leave you stuck against it for an extended period of time, leaving you highly vulnerable.
- Thunderclap - A basic PBAoE stun. Just block it. True to his other attacks it has appropriately jacked-up damage for what it is, so watch out if you're not the tank.
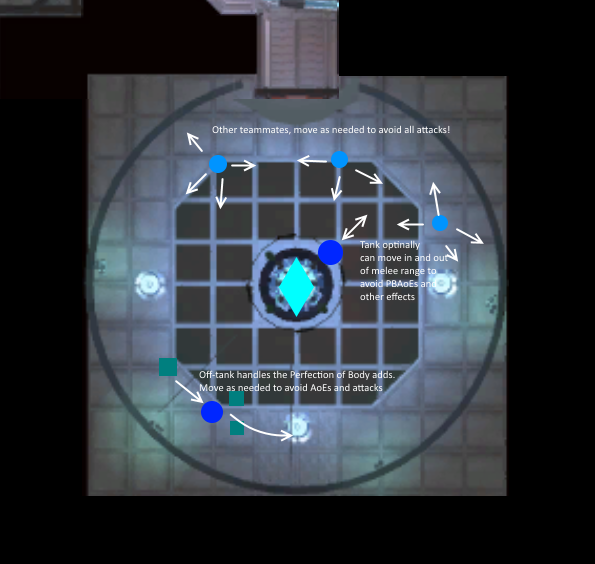
Teleios Ascendant - Strategy
 Tank - Things will get super-hairy for you, as Teleios is by far the strongest when it comes to damage output. Your goal, as usual, will be to direct his damaging attacks away from the rest of the team, which can usually be best accomplished by luring Teleios out to the edge of the room, and having him fight you up against a wall (much like grond). As stated before, be sure to watch out for his Radioactive Shockwave, and its defense-leeching properties!
If a teammate dies from Genetic Siphon, or if you've otherwise started the battle, always be ready to remind teammates that the debuff has landed on you - because of your high health, the Genetic Siphon comparatively does a lot more damage to you than to other players, and it's proportionately harder for a healer to keep you alive.
Off-Tank - Because of the riff-raff's high damage and knock, your role is valuable, albeit somewhat inglamorous, in keeping adds off of the rest of the team. The hardest part, starting out, will be using your attacks to essentially sieve the adds off of the tank when the battle first starts, as this usually is when aggro is the messiest. Once separated, however, the primary goal will be to survive and control, as usual.
The Off-Tank should not be the one to start the attack on Teleios - having the Genetic Siphon debuff on the off-tank is very bad, as it'll be their job to keep as distant as possible from the rest of the team. For this reason, on most runs with an off-tank, they are 100% the one player that is entirely excluded from the debuff's cycle.
Healer - Staying close to the main action, your big job is going to be keeping whoever has Genetic Siphon on them alive - in the primary Tank/Off-Tank strategy described here, this cycle also will include you, so a significant amount of the fight might very well be spent keeping yourself alive. Make sure to keep energy flowing to fuel your heals, and be attentive - keep a close eye on where the debuff is going, and where it has been.
With your aid, people afflicted with Siphon can survive to stacks as high as 50 or 60. However, reaching this point often is a sign that something might've gone wrong, and counter-healing 25% HP per second is not something that can easily be sustained.
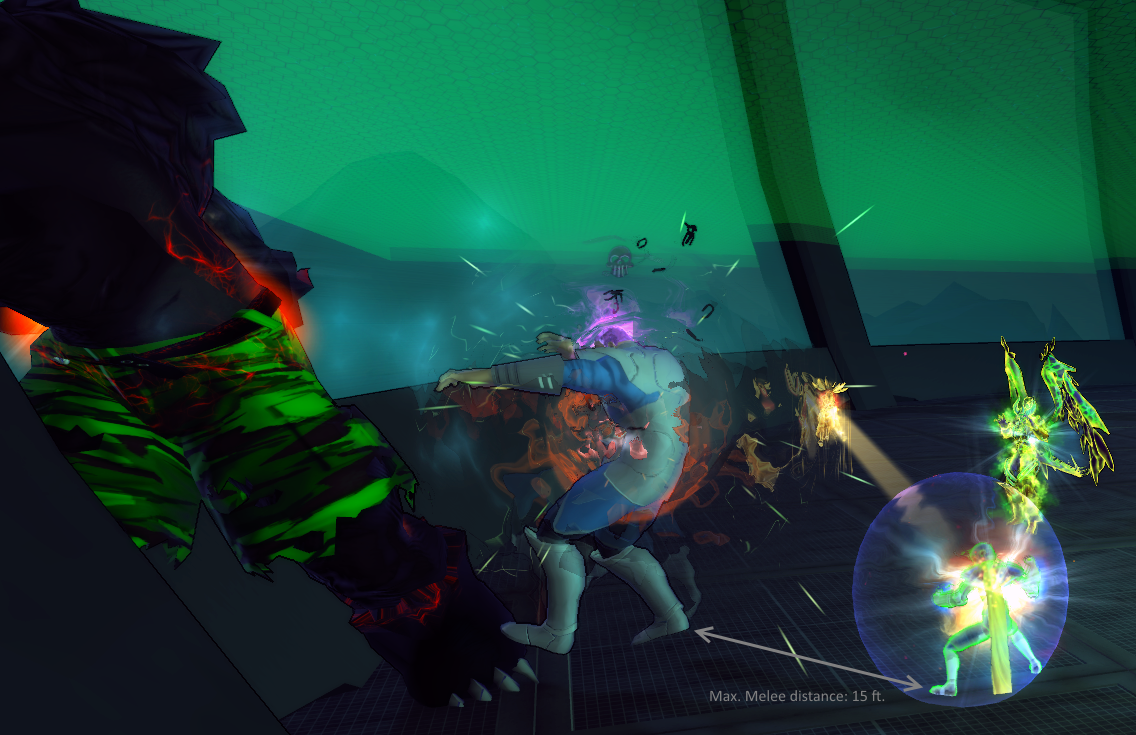 Melee DPS - This role gets its own section here, because there is a very important tactic to execute when playing as this role, and that's to always stay as far as possible from teleios while fighting him. By staying at the maximum melee distance of 15 feet, almost none of his incidental PBAoEs can hit you, and even his Thunderclap and Lance Rain will usually miss. By doing this, you can perform just as well as any other ranged DPS role. Not to mention, your more central position on the battlefield means that it's generally much easier to find you when it's time to pass the Genetic Siphon!
If there is more than one melee DPS on your team, practice careful angling/spacing around Teleios, approaching from different sides at maximum distance. This not only serves to protect you better from the stray attacks, but it most importantly prevents accidentally passing the poison too early.
Other Teammates - The big role that the rest of the team will have is to cycle and balance the Genetic Siphon, to prevent it from fatally taking out another teammate. While dealing your main damage to the Ascendant, keep an eye on your teammates' debuffs and make note of who has the Genetic Siphon stacks rising. In turn, if you have stacks on yourself that are cooling down, make note of its remaining duration so that you can move in to take the debuff up again to save your ally!
The Genetic Siphon sequence is best preserved if you keep a mental note of who you got it from, and who you should pass it to next. If everyone remembers just those two people, the siphon can be reliably and safely cycled around 3 to 4 people.
Optimal Roles
- Tank - Knock resistant with a powerful block
- Healer - AoE heals, extremely powerful heals (Iniquity, Celestial Conduit, etc)
- Off-Tank - Super-durable controller
- DPS - Ranged, mobil
e
Nenhum comentário:
Postar um comentário